New to the Crew, What am I in for?

mitka

Member
Hi Folks,

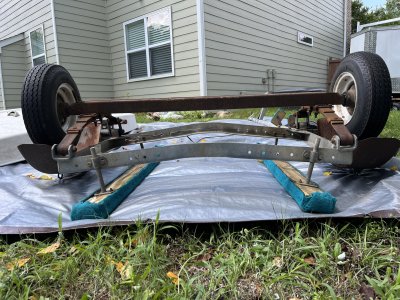
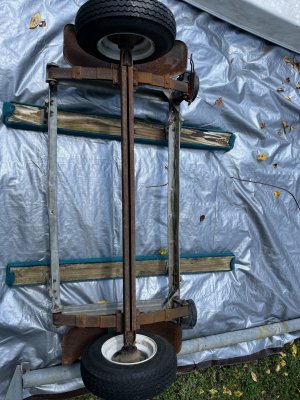
This past weekend I bought a Sunfish from a private owner in Alabama. The boat was his dads.He mentioned not knowing much about the boat, but it seems he new enough to lie about the year (this thing is NOT 1974, hah).

71002587785__2AC68373-6C92-444D-A274-112DCBF4A4F1.jpg


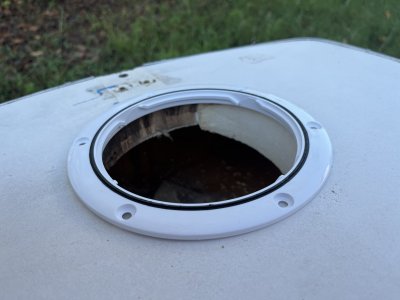
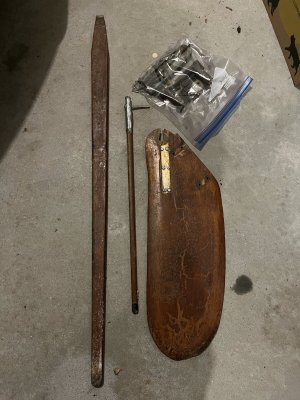
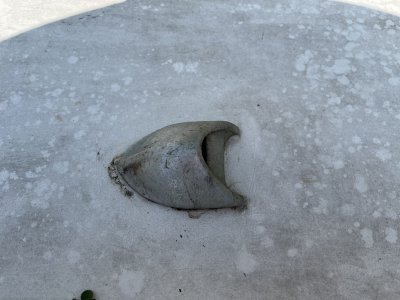
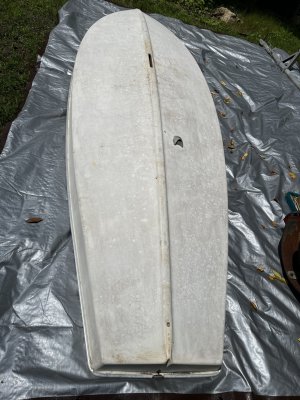
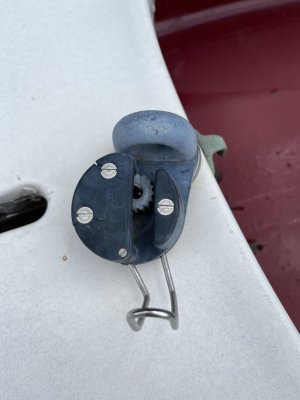
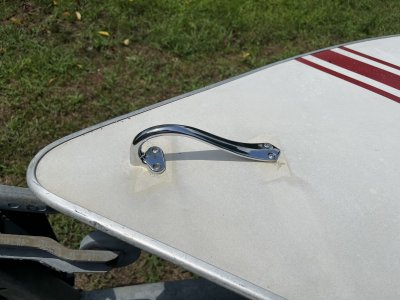
I am now the proud owner of a 1971-1972 Sunfish with the classic rudder bracket, cockpit-hull split and all. The rudder board is split at the top, and has a chunk missing. It would require some serious R&R to make structurally sound.

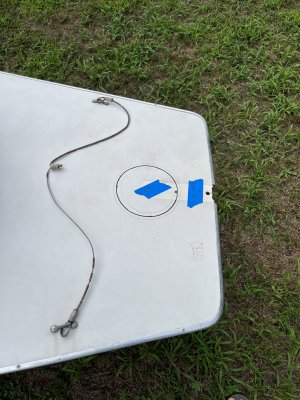
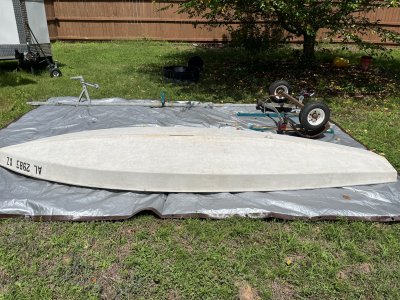
The Sunfish will be my daughter's first boat. She wants to skipper catamarans when she's older. I priced our the rudder conversion kit. Seems like a better option than replacing the rudder board. BUT, I'm not sure what to do about the design flaw in the cockpit, where the hull splits away from the bouncing around when towing.

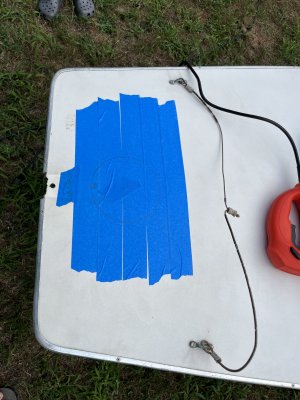
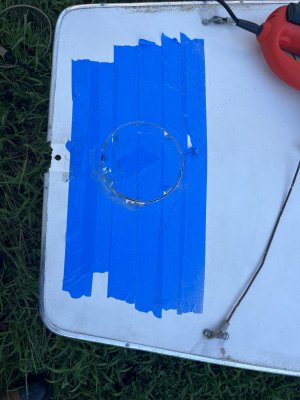
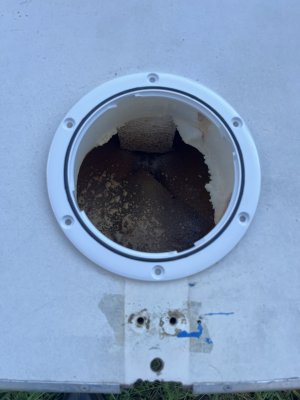
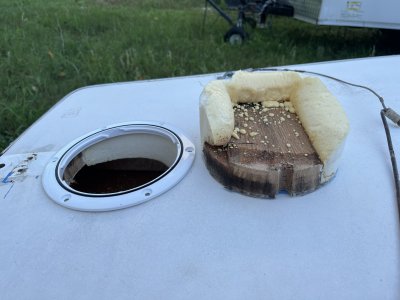
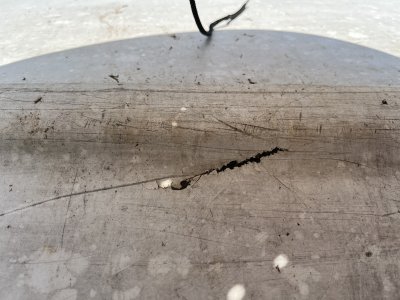
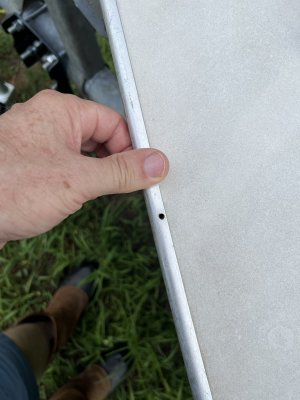
I'll have an access hole in the back after the rudder replacement, so draining any water in the hull will be manageable after an outing. The previous owner did an amateur's job of sealing the fissure up, but it's old and I should probably redo that at the least. Shall I flip the thing, sand it down inside the cockpit, and add a fiberglass flange to rejoin them?

Regards,

Kris
 
The cockpit "bottom" isn't the "real bottom".

Use search (magnifying glass) and put in "Shoreline method" to repair 'most anything Sunfish.

Was this trailer damage?

Take some pictures?
 
Referring to the issue described in the second paragraph here (I'm a new user and can't post links.... to... this... forum. Sigh):

/resources/sunfish-age-and-hull-identification.6/

I'll upload photos tomorrow. Working to get a bend out of the trailer frame, and will probably have good lighting after I get the boat back on it.

I'm also building a large shed in the backyard soon, and will turn the shed into a painting booth before I finish the inside. I want to restore a gel-coat on Sunfish, and need a proper clean-room/PPE.
 
The cockpit "bottom" isn't the "real bottom".

Use search (magnifying glass) and put in "Shoreline method" to repair 'most anything Sunfish.

Was this trailer damage?

Take some pictures?
I see a bunch of references to the "Shoreline Method" and no explanation of the actual method.

Nevermind; found this:

That looks... usable but not great. I think I'll see how deep the damage is, clear out the damage and surrounding area into a fillable shape, and rebuild the layers of fiberglass up from there. I plan to refinish the hull after the first few outings, and want a clean repair job to work with.
 
Last edited:
  • Like
Reactions: LVW
Here’s the rudder-tiller assembly parts. They are in pretty rough shape. If I buy a new rudder board, I can focus my time on refinishing/reenforcing the dagger board.
 

Attachments

  • A5BEE180-72DB-4F37-A5D5-24229E86ABB3.jpeg
    A5BEE180-72DB-4F37-A5D5-24229E86ABB3.jpeg
    1.1 MB · Views: 149
You should definitely buy a new style rudder. The one you have isn’t worth an attempted repair. They aren’t cheap- keep an eye out or post here in ‘wanted’ section for a used one.
In the meantime you can add the port in the stern and get the gudgeon and backing plate in.
 
The deck looks good be interesting to see the bottom. The shore line method is a major repair method. Have rebuilt keels and many other sections on sunfish with just building up layers of glass filing. filling, sanding and painting. I would not get into gelcoating. The boat is over 50 , repair the damage, leak test, change the rudder and get out on the water.
 
Thanks for the insight. I'll buy a new rudder conversion kit then, and get after the fiberglass repair.

I just finished up taking a stab at straightening out the bend in the trailer frame. Turns out it's hardened, and just springs back after I take the jack off of it. The problem is, as it the trailer bears HARD to one side. The axle is only slightly different between the mount to the springs. Maybe a little different has a huge impact here? I'm going to put it all back together again, maybe try to adjust the axle itself, the replace the wiring and lights.

Here are pictures of the hull and trailer body.


Referring to the issue described in the second paragraph here (I'm a new user and can't post links.... to... this... forum. Sigh):

/resources/sunfish-age-and-hull-identification.6/

I'll upload photos tomorrow. Working to get a bend out of the trailer frame, and will probably have good lighting after I get the boat back on it.

I'm also building a large shed in the backyard soon, and will turn the shed into a painting booth before I finish the inside. I want to restore a gel-coat on Sunfish, and need a proper clean-room/PPE.
 

Attachments

  • 6DA7D907-FC37-4197-91BD-24E61615A216.jpeg
    6DA7D907-FC37-4197-91BD-24E61615A216.jpeg
    1.7 MB · Views: 147
  • 367B0B30-1BBD-4E02-90F4-87AEF5F3CFC0.jpeg
    367B0B30-1BBD-4E02-90F4-87AEF5F3CFC0.jpeg
    1.7 MB · Views: 141
  • 26BC0185-718E-4A0A-A552-086BF1A54047.jpeg
    26BC0185-718E-4A0A-A552-086BF1A54047.jpeg
    1.8 MB · Views: 132
  • F002FDE9-4989-4450-B4BC-F386911A5981.jpeg
    F002FDE9-4989-4450-B4BC-F386911A5981.jpeg
    1.2 MB · Views: 124
  • 18F9C41E-8198-46CF-8F9C-3C45C88845F3.jpeg
    18F9C41E-8198-46CF-8F9C-3C45C88845F3.jpeg
    2.8 MB · Views: 135
  • 9A34075D-B572-4450-87F0-0BB30E27C96A.jpeg
    9A34075D-B572-4450-87F0-0BB30E27C96A.jpeg
    2.3 MB · Views: 129
  • 6FB93FFD-D4BC-43F0-8E8C-6AD630DDF1FA.jpeg
    6FB93FFD-D4BC-43F0-8E8C-6AD630DDF1FA.jpeg
    2.1 MB · Views: 119
  • C9A08D47-B399-403E-B552-9BB2CD7E8A3E.jpeg
    C9A08D47-B399-403E-B552-9BB2CD7E8A3E.jpeg
    1.4 MB · Views: 124
Looks like you’ve got a couple areas that could use a blind patch.

Use the search (or advanced search) feature on this forum, enter ‘blind patch’ and you should find plenty of info on how it’s done.
 
Thanks for the insight. I have a few photos of that one crack, so it looks worse than it is, thankfully. Also, the shadow makes it look like a hole completely through the hull, but it's the surface. I can see the fiberglass below it in person.

That said, I want to get this right. Once I've given the hull a good wash I'll clean up the hole and get it patched up with new fiberglass.

Afterwards I'll re-seal the seam between the top of the cockpit and the top.

Thanks again. This is all very helpful.
 
That approach is awful, there is no internal backing and an enormous amount of good fiberglass is disappeared with a grinder. The manufacturer recommended and used this Blind Hole Patch method, as serial Sunfish restoration expert Breeze Bender noted.

RM 4 Blind Hole Patch copy.jpeg


The Shoreline method is also a great structural repair.

This Sunfish group has a massive amount of Sunfish specific repair, 20 years plus online, and some folks have been here that long. This is THE Sunfish Forum, it would be beneficial to listen to their seasoned advice.
 
That approach is awful, there is no internal backing and an enormous amount of good fiberglass is disappeared with a grinder. The manufacturer recommended and used this Blind Hole Patch method, as serial Sunfish restoration expert Breeze Bender noted.

View attachment 56917

The Shoreline method is also a great structural repair.

This Sunfish group has a massive amount of Sunfish specific repair, 20 years plus online, and some folks have been here that long. This is THE Sunfish Forum, it would be beneficial to listen to their seasoned advice.
But my hole isn’t all the way through, so ¯\_(ツ)_/¯. Discussing the merits of the method without context (surface crack) seems academic, and I’m just a southern redneck, so considering the input breeze already provided and my inclination to NOT cut a hole completely through the hull unless absolutely necessary, gonna go with awful.

We’ll see what I learn from that choice, hah!
 
Strange, my edits reverted and I can no longer edit to re-add them.

Anyway, @Breeze Bender's advice is great but my photos weren't, and they made the damage appear to go all the way through. But it's not a complete hole, so the "awful" approach, while awful for a hole through the hull, seems workable for a more superficial crack.
 
Sunfish hulls are made of a waffle-like fiberglass weave called "roving". Its outside (smooth) surface is very thin and brittle. The inside (invisible) surface is especially rough, with a minimum thickness of less than 1/8", so even a small cut can leak water inside. (Making for a "heavy boat").

Hopefully, pressing firmly on one side of the "injury" will produce none of the sounds indicating structural compromise.

"Editing" one's post has a time limit of one half hour, or it won't take.
 
"seems workable for a more superficial crack."

We'll keep our fingers crossed that. If the spot you're referring to is the one on the keel then there is a lot of room to sand and repair there. As gelcoat is sanded off, a semi clear brown polyester resin and fiberglass woven roving matric will appear. If the matrix is cloudy, or cracked, or has voids, then we keep sanding until we get to solid, undamaged fiberglass.

I'll apologize that I post answers with all readers in mind and don't know the your expertise. Excited to follow your progress and see the results!
 
Thanks @LVW!

That’s helpful to know.

Just got back from a road trip. I’m looking forward to spending some time on the issue this weekend.
Good luck to you! I was in your shoes about two years ago. I now have 8 sunfish/sailfish and I’ve learned so much here. I’d be leery of some of those cracks, but what gives me pause more so is your reference to resealing between the top and the top of the cockpit?

Keep asking questions, post lots of pictures, and know that the folks here are very knowledgeable and really are happy to help.
 
Thanks!

Trailer update. I added a Jack and spare mount. Have to rewrite the lights this weekend - old ones were cracked and would have taken in water during launch.

Also need to replace a rivet and considering another part replacement.
 

Attachments

  • 56243F09-FBF1-4E91-8724-9CDE1F1A4642.jpeg
    56243F09-FBF1-4E91-8724-9CDE1F1A4642.jpeg
    2.1 MB · Views: 98
  • 06B2BF29-BB80-4779-AB4B-FB91252C9CE7.jpeg
    06B2BF29-BB80-4779-AB4B-FB91252C9CE7.jpeg
    1.1 MB · Views: 110
  • 8B651455-A112-4F5D-9443-0084EDEF4916.jpeg
    8B651455-A112-4F5D-9443-0084EDEF4916.jpeg
    638.7 KB · Views: 107
Today was exciting! I received the rudder conversion kit and new bow handle from Sunfish Direct today. Looking forward to installing both this weekend.
No new screws with the bow handle, and the backing plate isn’t predrilled. So “kit” in quotes perhaps.

C961D516-202E-4FCD-A8F7-C6E036EC1473.jpeg
 
Last edited:
Oh no!
Okay, looks like the screw that broke off may have saved me.
Although, the new handle does not come with screws.
Would someone kindly let me know what size and kind of screws secure the bow handle? Ye Ole Screw and Bolt drawer in my tool box has failed me this time, hah!
 
okay, the conversion kit from Sunfish Direct is turning out to be bad news. Bent bolt that’s partially stripped.
Feeling like a bit of a rip-off. I bought the kit cause I’m short on time, but looks like I’m fetching around the hardware store this weekend instead of actually working on the boat.

Ugh.
image.jpg
image.jpg
 
okay, the conversion kit from Sunfish Direct is turning out to be bad news. Bent bolt that’s partially stripped.
Feeling like a bit of a rip-off. I bought the kit cause I’m short on time, but looks like I’m fetching around the hardware store this weekend instead of actually working on the boat.

Ugh.
View attachment 57146View attachment 57147
Contact @cmac233 (Sunfish Direct) - Chris should help get this right for you.
 
Good luck to you! I was in your shoes about two years ago. I now have 8 sunfish/sailfish and I’ve learned so much here. I’d be leery of some of those cracks, but what gives me pause more so is your reference to resealing between the top and the top of the cockpit?

Keep asking questions, post lots of pictures, and know that the folks here are very knowledgeable and really are happy to help.
If you look from the perspective of the floor, the deck doesn't seem to meet the cockpit everywhere.

However, any reference to fiberglassing under there was to use 4" cloth tape to reinforce the overhanging cockpit lip so that surface doesn't weaken with time and one's weight.

Expect spider-cracks to develop otherwise after 50 years. :rolleyes:
 
Oh no!
Okay, looks like the screw that broke off may have saved me.
Although, the new handle does not come with screws.
Would someone kindly let me know what size and kind of screws secure the bow handle? Ye Ole Screw and Bolt drawer in my tool box has failed me this time, hah!
The original screws were slotted screws, but I'd go with stainless, oval-top, Phillips screws of at least one inch. Maybe #8?

I'm sure someone will correct me! :rolleyes:

Hopefully, there is still some wood under there. Maybe inject a blob of THIXO?

The threaded part does appear bent, but there's normally a taper at the ends. The screw looks like it got overtightened.

"Fetched"?:oops:

You speak Suthin'? The real test is you'll know what Di-Does means. ;)
 
Alright! The #8 oval tops were perfect! #10 was right out.
And that bent bolt that came with the kit? NO idea what it was for, when thought I bout a bag of two replacements, hah. Turns out another bolt was in the kit to attach the tiller and rudder.

Now… WHY no nuts with the bolts for the rudder mount?! And the holes aren’t large enough for the provided bolts. This kit needs some love. So many things are off.
 

Attachments

  • C8AD0B78-EE2A-49CE-8F4A-C7806462C1B8.jpeg
    C8AD0B78-EE2A-49CE-8F4A-C7806462C1B8.jpeg
    1.5 MB · Views: 99
I’ll likely do the same. I’d feel much more comfortable; I can’t make out the threads, but they fit as though they are threaded. I like the chunky reinforcement bracket. Going to drill holes and find nuts and washers tomorrow.

Struggled with Bearing Buddies today. The tolerance level on those are throwing me off. I keep getting the wrong size.

I am looking forward to installing the porthole and getting a look at the condition of the interior.
 
I applaud your efforts, and respectfully posit that you are moving at light speed on this entry to the Sunfish world. You’ve got modern pieces that are spendy enough (the new class-legal dagger board) that I (again, I swear respectfully) make me ask…. Why don’t you just buy a brand new or recently late model Sunfish? Do you enjoy the restoration process?
 
Hi, it’s complicated.

I am weighing the value of my time, the experience of fixing something that is broken when you are young and then using it (daughter’s first boat), the state of various things I have going on (building a shed in August that I can use as a paint shop before finishing the interior), and the reusability of what I do spend money on and what I do myself (eg, refinish the dagger, replace the rudder assembly, repair the hull). I also have had to stay close to home for a few months while a family member recovers from surgery - I would have felt bad having a brand new 14-18 ft boat in the driveway that I could not use a whole lot for a while.

A few other reasons in there too. And of course feedback from this forum. ;)
 
Please post some more pics when you can of damaged areas, and undamaged areas. She's a purty boat!

I don't know if we'd buy a new boat right now. In the military aviation community, the mantra is "Never fly the "A" model of anything." Better to wait and let other folks be the test pilots with the shiny newest aircraft. I love flying the greasy, grimy aircraft with chipped paint, they are the workhorses. When I walked out to a shiny new choppa or jet, I groaned, because there was a good chance she was the Hangar Queen.

With LP hopscotching production facilities form RI to China to Uk to Portugal over the last few years and then radically changing from the time proven hull construction concept, materials and design to the current flotation bladders and cored deck, there are a lot of things to consider. Now we might knock someone over to get a Vanguard hull or the last few boats that LP built in Rhode Island.

Back to mitka's boat, which needs a name btw. We'd buy 1971 hulls all day long, fiberglass production had been rolling along at ALCORT for a decade, and the Sunfish concept was 18 years old.
 
Today I took some time at the end of the day to cut the access porthole in advance of installing the new rudder bracket. The interior seems to be in good shape - no water damage. Smells like the 70’s :)

Pics…

Tomorrow I’ll install the cover fully (need more screws), and drill the brackets so that I may through bolt them to the …. transom? Is it still a transom if there is no interior area?
 

Attachments

  • CF7BDEEA-A9F6-444C-BEFD-8B97C47C1568.jpeg
    CF7BDEEA-A9F6-444C-BEFD-8B97C47C1568.jpeg
    1.1 MB · Views: 88
  • 944ACDFE-4C81-4161-BC4E-5B5C4735CFEC.jpeg
    944ACDFE-4C81-4161-BC4E-5B5C4735CFEC.jpeg
    915.8 KB · Views: 93
  • CC4A92C7-4A56-4A6E-9E11-95ECC2FF8C68.jpeg
    CC4A92C7-4A56-4A6E-9E11-95ECC2FF8C68.jpeg
    555.5 KB · Views: 93
  • A34D65E0-DE5B-4248-9E99-D6F7D6EC7D89.jpeg
    A34D65E0-DE5B-4248-9E99-D6F7D6EC7D89.jpeg
    1.3 MB · Views: 97
  • 9DAA2FFB-5D87-433A-8E6A-BE2CA24CA005.jpeg
    9DAA2FFB-5D87-433A-8E6A-BE2CA24CA005.jpeg
    1 MB · Views: 100
  • 51498B8C-8A7C-4228-939D-0F6000E22285.jpeg
    51498B8C-8A7C-4228-939D-0F6000E22285.jpeg
    1.3 MB · Views: 98

Back
Top